A Continuous, Bulk Ink System for my Epson R200
Originally posted December 2004
A few months ago I purchased an Epson R200 ink jet printer. This is an excellent, inexpensive printer that prints on inkjet-printable CD-ROMs and DVDs. I am impressed with the quality of the printer, especially considering that the printer can be purchased for about $80.00 online.
However, after short use of the printer, I realized that Epson is “giving away the razor and selling the blades.” Consider this: The printer costs $80 and comes with a full set of cartridges. And Epson sells a full set of replacement cartridges for about $80! The way I think, it would be better to simply keep buying new printers rather than buy the replacement ink that costs just as much!
I didn’t like the idea of replacing my printer every time I ran out of ink, so I researched other options. I found that third-party ink cartridges can be purchased at less than half the cost of the Epson-brand cartridges. Still, with the amount of printing I do, this is still too costly in the long run, if something else can be done.
Enter Continuous Ink Systems. A Continuous Ink System (CIS) is basically a jerry-rig setup where ink is fed from bulk bottles right into the printer, and you never change cartridges.
Before I go on, let me mention that Epson says using anything except their brand of ink cartridges voids the warranty on the printer. So you are warned. But do the math: a new printer costs the same as a new set of Epson cartridges. Who cares about the warranty? Not me.
So without further ado, here is my short and sweet review of a CIS for my Epson R200.
Continuous Ink System from InkRepublic.Com
I did a little bit of Googling and found that CIS prices range from $80 to almost $250 (with ink included). After filtering marketing noise, it appears that the difference between the expensive systems and the cheap systems is the dampers – the final stage between the ink bottle and the print head. The cheap systems use sponges that can dry out and supposedly stop working after five months on average, and there are “horror stories” of ink leaking after prolonged use. The expensive systems, like the one I got from InkRepublic.com, don’t use sponges at all. Well I don’t know anything about how printers are made, so I just do the math: three sets of Epson cartridges would cost me $240. A CIS will last a lot longer than three sets of cartridges would, and after the ink is used up, I only need to by replacement bulk ink, not a whole new system. So if it works, I will save money no matter what. So I got the “pricey” system from InkRepublic.Com. They sell systems for various printers: the one I got works on the Epson R200 and R300.
My order was processed fast: I ordered it on a weekend and received it by Priority Mail the next Wednesday. Also, after I placed my order, I sent an email asking how it would be shipped, and they responded within a half an hour to let me know.
Some Assembly Required
Here’s the thing: if you don’t like the idea of a good half-hour of assembly work with latex gloves on your hands, don’t bother with a CIS. And be realistic and expect it to take you and hour to set the system up. Here’s a photo of most of the parts before getting down and dirty with the ink. This photo shows the parts after I separated the ends of the tubes and put the “ink stoppers” on them:
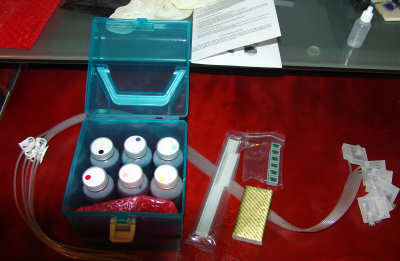
The system comes with tubes, tube guides, six bottles of bulk ink (the R200 uses a six-color system), a chipset, and a “vacuum” which is just a bottle, and some gloves. Do what I didn’t do: keep the gloves on until you’re done. I have ink on my hands and I don’t think it’s going away for a week.
I guesstimate that each bottle of ink has 10 cartridges-worth of supply in it. Just a guess.
Included in the package is a Video CD (you should be able to play it in your computer or a DVD player) that shows someone putting the system together. Watch the whole thing first before you even start. It also comes with a one-page “manual” folded in half that explains each step, but you’ll need to use it in conjunction with the video to get the work done.
Once you get the tubes into the bottles, you have to prime the cartridges. This is a little tricky, because once you prime the carts, you have to immediately pinch off the “ink stopper” to prevent back flow and prevent spillage. Here’s a photo of everything done before I put it in the printer:
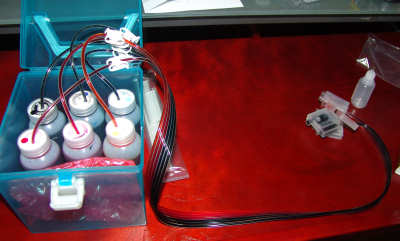
You have to take care to make sure you get the ink colors in the right order, which means you have to open your printer and plan ahead for cartridge placement. One of the cartridges seemed to be ‘reversed’ in my set, so I used it as a key and put black in it and went from there.
Once all of this work is done, you need to pull the old Epson cartridges from your printer and put the new “chipset” in. The chipset fools the printer into thinking it has ink cartridges in it and the printer won’t work without it. Some notes on this: You have to have a working setup with Epson cartridges before you try to install the CIS. The printer will refuse to start working if it has never had “real” cartridges in it. Also, it took me three tries to get the printer to power on without error lights with the CIS chipset. And I don’t mean just turning it off and back on, I mean taking out the chipset and new cartridges, putting the Epson carts back in, getting it working, then removing the Epson carts, … Save yourself some trouble: I found (after dripping ink into my printer and on my desk a few times) that you can put JUST the chipset in and see if the printer will recognize it. Until it thinks it has working cartridges, save yourself the trouble and DON’T actually put the new CIS cartridges in. And once you do, don’t forget to un-pinch the ink-stoppers, or you’ll get nothing more than a little blob of ink on your page.
Now understand that this review is not an attempt at a full “how-to” guide. I am not trying to tell you everything to do: watch the video and read the instructions. I am just trying to give you an idea of the hassle that awaits you if you get a CIS. So I am now going to skip ahead a bit.
Once the system was fully installed, I did a nozzle check. I was very disappointed to find a lot of missing bars on the nozzle check pattern. The instructions say to try a head cleaning no more than just twice, and then let the printer sit for a while before trying to print again. This sounded odd to me, but it works. I set the CIS up yesterday and couldn’t get a clean nozzle check. This morning, it’s perfect!
Here’s a photo of the completed system printing a photo:
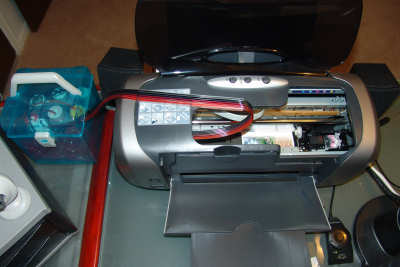
Note the wonky, jerry-rig nature of the setup. I have this bucket-o-ink on the left of the printer. (And you want to make sure you put the ink on the same level as the printer, or physics will take over and you could end up with ink dripping into your printer when you’re not using it.) I had to experiment a bit with the ink tube guide to get it in a spot that would not in some way obstruct the print head movement or make lots of worrisome noise. The tubes into the cartridge holder look like this:

I had to spend some time getting just the right “fold” on the tubes in the holder to make sure the tubes come out just the right way to properly glide back and forth.
And yes, this means I can’t close my printer all the way. But the cover sets over this setup fine, it just won’t completely close, and I feel more comfortable leaving it open while it prints.
Well, 24 hours after starting installation, I printed a test photo to see how it looks:

Now, Epson will tell you that not using their ink is a bad thing because the quality of the print is not as good. Frankly, I can’t see a problem with my prints, and neither could my wife. They look great.
Here’s a close-up of my bucket-o-ink:
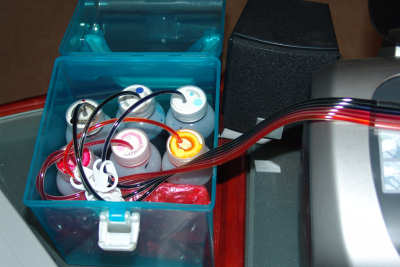
And another word of caution: if you go to remove the CIS cartridges from the printer, PINCH THE INK-STOPPERS CLOSED FIRST! Otherwise ink will siphon all over your printer.
Final Conclusions
Well, bottom-line: it works. However, it is a little “cheesy” and was a pain in the neck to set up. But it will save me hundreds of dollars a year at least.
I am not one to begrudge a company their profit. But Epson can profit off someone else buying their liquid-gold ink. As for me, I have a bulk ink system that works.
Update – Feb 4, 2005
Well, it’s been a little over two months and several hundred printed discs since I installed the CIS. And it’s working great, and none of my bottles are even half used up.
I’ve received a few emails from people coming across this review and asking me about other CIS systems that cost less. Basically, from what I have read, it seems that many of the cheaper systems use inferior cartridges (made with sponges) that can fail or damage the printer, or may have problems with air in the ink tubes. All I know for sure is that I am quite pleased with my InkRepublic ink system. It may help to think of it in terms of loss: If you get at least $80 worth of prints out of a CIS before it fails, then you really haven’t lost anything, even if your printer is damaged. This Epson R200 is basically disposable anyway.
Another update – Jan 2006
Well now. This little review sure does get a lot of traffic! I get a lot of email asking me how things are going, so here is another update.
It took several months of heavy use to use up all of the ink that came with the CIS. I ordered more ink for the kit, but before I could switch bottles, the printer finally wore out and died. The CIS had nothing to do with the printer finally breaking down — it was used very heavily, and hey, it’s a $90 printer!
I replaced the printer, but haven’t re-installed the CIS, because, well, I just don’t feel like I have the time to do it. Instead, I have been using third-party ink cartridges. And they seem to be working just fine, and are more convenient to install than the CIS, and cost half what Epson charges for their cartridges.
The question I get most is “would you still recommend it?” Well, the answer is that I wouldn’t change anything in my review text above. It’s a good move if you want to save a lot of money on ink and don’t mind the installation work.
I’ve got two Niagara CIS one for an Epson 880 that I’ve had since 2001 and one for a Canon i9100 that has been in service since 2005 or was 04′ can’t really rember. I have to change the waste ink pads in the printers maybe every 18 months and that entail takeing the cover off the body of the printer but the many thousands of dollars saved help pay for the true cost of digital photgraphy and that’s the cost of photo quality paper. I couldn’t afford to be with out my CIS.
I also have a Continuous Ink Supply System (CISS) but I have the one for an HP OfficeJet Pro. Mine was easy to install and worked for about 2 months. But then it stopped printing red. I did the usual print head cleaning, removed and reinstalled the cartridges, etc. After almost 6 hours of troubleshooting, red came back. Then 2 weeks later, black lines started appearing … a classic symptom of needing to align cartidges. But that did no good. 2 days later, that went away on its own, thankfully. It’s been 7 months now and the most prevalent issue is losing the ability to print red. I have attempted to get product support but after the first 2 email “solutions” did not fix it, they just stopped returning my emails. And it always fails when we are doing a lot of printing. It seems that anything more than about 50 photos and we lost red … then it comes back after hours of head cleaning and playing with the cartridges. I have now decided that it just isn’t worth it. Having a functional printer when we need it is more valuable than the cost savings. But I might try some refillable cartridges instead. The CISS appears to be plagued with pressure issues but I can’t be sure. I hope that if you go this way again that you have better luck than I have.
Hi Brandon, thanks for sharing your experience with us. Your great review lead us to pick up a couple CIS units from InkRepublic.com, and they have been working GREAT for several years.
Now we just got our Epson Pro 3800 printer for main production. I looked at inkrepublic’s site and found that they do have 3800 i-refill ink system. It’s an interesting approach to Epson Pro 3800 refillable system. Just
wondering if any of you has tried this?
http://www.inkrepublic.com/3800-irefill.asp
any feedback and tips?
thank you.
I just purchased a CIS unit for my Epson cx9400Fax but it keeps saying “Cannot recognize ink cartridges” after I print a couple of pages. Is there a way to fix this without taking the cartridges out and putting them back in all the time.
Thanks for you help.
Vikk
hi guys, I just want to get you guys some update. I finally got InkRepublic 3800 i-Refill with 900ml inks, costs me only 350 bucks. Great deal.
The system prints beautiful pics, indistinguishable to my eye from the original Epson carts!!! and very glossy. The documentation is very very helpful and very thorough!
http://www.inkrepublic.com/KnowledgeBase/3800-irefill-faq.asp
It tells you step by step and also tells you how to reset Ink Level / Cartridges and Waste Ink Maintenance Tank. This is incredible! I now can reuse my same waste ink maintenance cartridge instead of paying another 30 bucks to Epson in order to get a new maintenance cartridge!
It took me 20 minutes to install the whole thing and I think the installation is easier than our old InkRepublic CIS since this 3800 i-Refill system does not require any tubes. It works as easy as epson cartridge, and it works better than epson cartridges since I can reset cartridge and I can reset waste ink tank. The pressurized cartridges from inkrepbulic.com works better than epson’s and it has larger capacity, 150ml, about double of epson’s cart.
I bought a Print-on-a-Dime” CIS two years ago for my R200. Cost was $55 plus about $5 shipping. I am now halfway through my second set of 1 pint bottles of ink and have no complaints about the ink system. On my other Epson printers, I use the SSC Service Utility (www.ssclg.com) to reset my chips and to reset the ink dump counter (which will eventually turn the printer off logically if not reset).
I used to have one of these setups for printing photos, it was great and a huge money saver. Also it’s nice to be able to experiment with different types of inks.
I received the Epson R200 CIS last week.
The PDF instruction files are bad – they are 0-byte files.
I’ve sent 2 emails to InkRepublic’s support group.
No replies yet.
I’m wondering if I’ve made a mistake buying their system.
They can’t even check to see if the instruction files are any good before shipping them.
Nervously waiting…..
From whom are you buying the third party cartridges? I would like to go that route (after reading the reviews about the CIS), but I also don’t want to waste $$ since I’m a student.
try inkrepublic knowledge base. it’s been very helpful.
I just got a CISS for my Epson Workforce using Pigment Ink. I use it for heat transfers to make custom demotivational mousepads. In a single day, I used the equivalent of 2 sets of epson cartridges. I’m VERY happy with my setup. I’m having trouble getting bright red though, it comes out looking purple-ish. (not so bad that it’s unusable, just a bit of a pain if an image has LOTS of red in it) … I’m sure I’ll figure it out. (It was a pain to get it working, but once working, it’s amazing)
Good articel on CIS from fellow Christian – I look forward tol hearing from you.
I bought a CISS system for two different epson printers on eBay, I just bought the very cheapest one on there, I think it well less than $40, and refill bottles are only around $20. It has worked beautifully, prints are identical to the original cartriges, I’ve had mine for more than a year and it is still working great. I did have to remove the cartridges and put them back in a couple of times when the printer complained, but not a big deal. Also have done a couple print head cleanings which resolved any problems.
I started caring about ink cost with my HP L7680. First I purchased refillable ink tanks with self-resetting chips off ebay. I seemed to lose my yellow/black printhead pretty often but it was still cheaper than buying OEM ink. I still purchase all my bulk ink on ebay. After researching a bit about the L7680 I found that it isn’t that great a printer and tends to fail often. Its popularity dropped and I was able to purchase it for $100 instead of its original price of $350… so I bought two… one of which failed right out of the box and hp replaced. Also purchased a CIS from inkproducts.com I didn’t have to assemble anything, just stuck it in the printer. I’ve learned printing bulk flyers that choosing paper type is important. If I forget to choose “postcard paper” for my thicker flyers I end up with lines and needing to clean the printhead after 20 flyers or so. Its a process but I’m learnin’.
Does anyone know how to get rid of air bubbles in these systems? I bought a jetstream continuous inkjet system for £35 here in the UK when i bought my new Epsom P50 and i’ve noticed it is not printing Yellow, and hence green also. When i had a close look i saw a few bubbles in the yellow tube, so obviously the yellow ink isn’t getting through. Any help would be appreciated.
Graham, I dont know if your p50 is identical to Artisan 50 in US market?
I also suggest only get a real good system like InkRepublic’s Artisan 50, not the one with air bubbles and leaks all the time which would waste you a lot of inks and time. you may want to re-prime the ink lines or something.
below is the setup pictures from inkrepublic’s artisan 50 cis users.
http://www.inkrepublic.com/members/SteveMathieu/review.asp
God bless.
Ande
hi there, there are “two” types of CISS system.
I bought a Canon Pixma i2770 which comes with 3 years warranty. And a CISS system for $20
What this CISS system does is, it directly “punctures and connects” to the original ink cartridge itself, without disturbing any of the printer’s electronics.
so, if the printer breaks down, I can claim warranty. if it breaks down after 3 years, I’ll buy another printer, and re-use my cartridge.
It is not recommended to let the printer be idle more than 1 week to prevent drying of the head.
so for printers that uses cartridge with built-in heads like canon, CISS is advantageous and “portable”
Nick Chan which CISS did you purchase that connects directly to the original cartridges?
There is a federal law called the – Magnuson-Moss Warranty Act.Basically it says that No warrantor may condition the continued validity of a warranty on the use of only authorized repair service and/or authorized replacement parts.
For example, provisions such as, “This warranty is void if service is performed by anyone other than an authorized ‘ABC’ dealer and all replacement parts must be genuine ‘ABC’ parts,” and the like, are prohibited where the service or parts are not covered by the warranty. These provisions violate the Act in two ways. First, they violate the section 102(c) ban against tying arrangements. Second, such provisions are deceptive under section 110 of the Act, because a warrantor cannot, as a matter of law, avoid liability under a written warranty where a defect is unrelated to the use by a consumer of “unauthorized” parts or service. This does not preclude a warrantor from expressly excluding liability for defects or damage caused by such “unauthorized” parts or service; nor does it preclude the warrantor from denying liability where the warrantor can demonstrate that the defect or damage was so caused.”
Linda so basically what your saying is. Based on the Act The manufacturer should honor the warranty whether we use an CIS system or not because they can’t prove that the damage was caused by the CIS system. Interesting, I wonder if there is a similar ACT in other countries/states/provinces.
Hi
I have twoP50’s and 2 older 1290’s that I use at school for my Photography A level students all with CIS systems. Using Epsons cartridges is not cost effective.
Had no problems with leaking systems but occasionally ink heads block but a quick clean usually rectifies the problem. This is a bigger problem following school holidays when printers sit idle.
The two newer P50’s still come up with the problem of cartridges needing replacement (the printer thinking it still has Epson cartridges) so a quick removal of the CIS cartridges and re insertion remedies the problem.
Quality of the prints, especially from the p50’s are excellent.
You can buy the P50’s with the ink cartridges filled and connected all you have to do is replace the old cartridges with the new CIS system and away you go.
Definitel saving us £100’s a year!!!
GRAHAM the best way to get rid of air bubbles is using the syringe that came with your system.this is what i did.disconnect the cartridges from the printer and you will see a hole protected with a plastic plug disconect the plug (do not forget to ware gloves just in case)put the syringe in the hole and suck the ink until you start receiving the ink (You will see the ink moving thru the hose),when you finish return the ink into the main tank put back the plastic plug (just do not loose the plastic plug) do not forget to HEAD CLEANING with your printer and nozzle check
Good information here. Just want to share my experience with you all too.
Brandon’s post is very helpful. I purchased InkRepublic R2000 CISS last xmas, and it’s been working very well so far.
http://www.inkrepublic.com/R2000.asp
their pigment inks are great quality too. I can reset the ink level easily. The tubing is a little bit tricky but it works well. I like their free shipping policy since I am in UK and they are in california. free shipping to my home country :) great saving, and great system.